


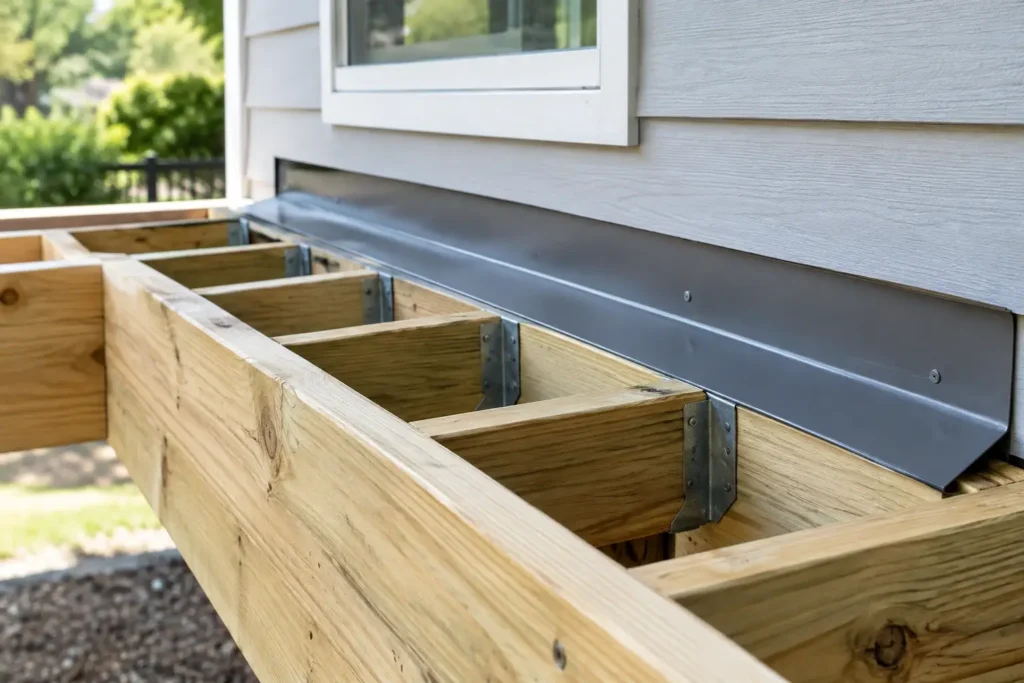
A deck can look solid from above while water is working into the structure below. In the Pacific Northwest, that is often how rot starts: not with one dramatic leak, but with years of rain collecting at connections, against the house, and on the tops of framing members. So, does deck framing need flashing? Yes, in the locations where water can enter, collect, or become trapped. The most critical area is the deck ledger where the deck attaches to the home, but other protective details matter too.
Flashing is not an upgrade reserved for high-end decks. It is a basic part of building a deck that can handle Seattle-area weather and give homeowners a clear view of what they are paying for: framing that stays dry enough to perform as intended.
Does Deck Framing Need Flashing at Every Board?
Not every piece of deck framing receives traditional metal flashing. A freestanding deck, for example, has no ledger attached to the house, so it does not need ledger flashing. And individual joists are usually protected with joist tape rather than bent sheet-metal flashing.
The practical answer is that a deck needs the right water-management protection at every vulnerable transition. That includes the ledger-to-house connection, the top edges of joists that sit beneath deck boards, beam and post connections where water can linger, and any place where a deck meets siding, masonry, or another structure.
These details do different jobs. Flashing directs water away from the house and out of the assembly. Joist tape shields the upper surface of framing from water that slips through deck-board gaps. Neither is a substitute for the other when both are needed.
Ledger Flashing Is the Non-Negotiable Detail
A ledger board is the horizontal piece of framing fastened to the home that supports one side of an attached deck. Because it penetrates or sits directly against the exterior wall, it is one of the highest-risk locations on the entire project.
Without properly installed flashing, rain can run behind the ledger, soak the wall sheathing, and remain hidden behind siding. The ledger itself may rot, but the greater concern is often damage to the house framing, insulation, and interior finishes. By the time a homeowner sees staining, soft siding, or a sagging deck, the repair may involve far more than replacing a few boards.
Proper ledger flashing is integrated with the home’s weather-resistive barrier and siding so water sheds over the flashing rather than behind it. The exact approach depends on the siding material, the age of the house, the deck elevation, and existing site conditions. Fiber-cement siding, cedar siding, stucco, brick veneer, and manufactured stone all require different attention at the connection.
A piece of flashing simply tucked behind the ledger after the fact is not always a dependable repair. In many cases, siding needs to be carefully removed and reinstalled so the water path is correct from the wall down to the deck. That is why a detailed site evaluation matters before quoting a deck replacement or repair.
What a Proper Ledger Connection Should Accomplish
A sound ledger detail keeps bulk water out, allows water to drain away, and avoids trapping moisture between wood and the house. It also needs compatible fasteners and connectors. Some flashing materials can react with certain treated lumber or metal hardware, so material selection should be planned instead of treated as an afterthought.
Local building requirements generally address deck-to-house connections, but code compliance is the starting point, not the finish line. In Seattle’s wet climate, workmanship around the flashing, siding, fasteners, and drainage is what determines whether the detail holds up over time.
Joist Tape Protects the Framing From Above
Deck boards are not a waterproof roof. Even tightly installed boards allow rainwater through their gaps, and composite decking can keep the surface looking clean while water continues to reach the framing below.
Joist tape is a self-adhering waterproof membrane installed along the tops of joists, rim boards, blocking, and beams before deck boards go down. It helps prevent water from soaking into the end grain and flat upper surfaces of pressure-treated lumber. Those are common locations for checking, splitting, and early decay.
For a new deck, joist tape is a practical investment because the labor to apply it is small compared with the cost and disruption of removing finished deck boards later. It is particularly valuable where boards meet at a picture-frame border, where extra blocking is used, and around stairs or rail posts that create more horizontal surfaces.
Joist tape does have limits. It cannot correct poor drainage, undersized framing, improperly installed deck boards, or a ledger that is already leaking. It also needs to be applied to clean, dry framing and installed with care so water does not get directed into a pocket or trapped under a loose edge.
Other Deck Areas That Need Water Protection
The ledger gets the most attention, but it is not the only place where moisture can shorten a deck’s life. A well-built deck manages water throughout the structure.
Beam and post connections should be detailed so water does not sit on top of a beam or against the end grain of posts. Hardware should be rated for exterior use and compatible with treated lumber. Where posts support a covered deck, pergola, or outdoor room, the design must account for water traveling down roof lines and collecting at post bases.
Deck boards should have appropriate spacing for drainage and seasonal movement. A deck surface that holds leaves, moss, dirt, and standing water will keep the framing damp longer, even if the hidden protection is installed correctly. This is one reason maintenance matters in shaded Seattle and Eastside yards.
Stair stringers, rim boards, and cut ends also deserve attention. Fresh cuts in treated lumber can be especially vulnerable. Depending on the material and location, they may need end-cut preservative, tape, protective caps, or a design change that limits direct exposure.
Attached Deck or Freestanding Deck: The Trade-Off
A freestanding deck can eliminate the need to fasten a ledger to the house. It is supported independently on its own posts and footings, with a small separation from the building. This can be a smart choice when the existing wall has complicated siding, water damage, masonry details, or conditions that make a reliable ledger connection difficult.
However, freestanding construction is not automatically better. It may require additional footings, beams, posts, and engineering considerations. Site slope, deck height, access, utility locations, and railing requirements all affect the decision. It can also cost more than an attached deck, depending on the layout.
The right choice comes from evaluating the house and the proposed deck as one system. A lower-cost approach that compromises the wall connection or drainage plan is rarely a real savings.
Signs Your Existing Deck May Have Flashing Problems
Homeowners do not need to pull up every board to spot possible moisture trouble. Warning signs often show up near the house connection first. Look for soft or swollen siding above the deck, staining on interior walls near the deck, rusted or corroded hardware, gaps opening at the ledger, or areas that feel springy underfoot.
Rot at the rim joist, loose railing posts, cracked deck boards near the house, and recurring moss growth can also point to poor drainage. None of these symptoms proves that the flashing has failed, but each is a reason to have the framing inspected before making cosmetic repairs.
Be cautious about simply covering the problem. New composite boards over compromised framing do not solve a leaking ledger, and a new waterproof coating cannot repair hidden wall damage. A clear repair scope should identify what will be opened, what will be replaced, and how the rebuilt connection will shed water.
Plan Flashing Before the Deck Boards Go On
The best time to handle flashing and framing protection is during design and construction, when the wall, ledger, joists, and drainage paths are accessible. It is easier to make good decisions before finished decking, railings, and siding conceal the work.
For a deck replacement, ask how the existing ledger and wall will be inspected, what flashing detail is planned, whether joist tape is included, and how the contractor will address any rot discovered after demolition. A detailed fixed-scope bid should explain the known work clearly and identify how concealed damage will be handled, so there are no guessing games once the old deck comes apart.
Seattle Fence and Decks evaluates these details during onsite estimates because a deck should not only look right on completion day. Call Kevin at (425) 449-6739 to schedule an onsite estimate for your next project. A deck built for Northwest rain starts with the parts you will never see after the final board is installed.